Tuesday, June 6, 2017

How To Get An Approved Facebook App ID & Secret Key 2017

Facebbok Appid and secret key for WordPress and Blogger


Facebook has always been the preferred mode to connect with peoples on the internet. It does not allow only to chat with friends but also allows to developers to connect their blog and website between their applications.

One of the most branding tips you will find for you site is to create a Facebook fan page. Because, it provides several integrations like comment box plugin, like & share button, Messenger (also available for the website as a contact form), log in with Facebook form, and my favorite 'Open Graph Meta Tags' which is very crucial in Search Engine Optimization.

Facebook App ID key which is the unique numerical identifier helps to determine not only the source of traffic and app usage in Insights, but also track which ad has been most effective in getting your audience to your Facebook app (very helpful, if you are an internet marketer) because these application uses Facebook API and function to get authenticated.

The below step by step guide will help you to create a unique and approved Facebook app id (or secret key) for a page you administrate. By this guide, you can create multiple app ids for another apps and blogs.

1. First of all, go to http://developers.facebook.com/apps

1. If you are making your first app, then FB will ask you to register as a developer by your phone number verification. It's free.

2. You need to switch to your personal profile before you can access the apps you admin developer apps section.


2. Now, after being a facebook app developer. On your Dashboard, click on 'Add a new app'. see below image

App-ID and api secret key for blogger and website
3. Now, a pop-up window box will appear asking you to enter app name, contact email, category. In the category option, just select 'App For Pages'. and after that, click on 'Create App ID'. see below image

App-Id for Facebook Open graph protocol blogger wordpress
4. Then again a pop-up window box will appear asking you to enter Captcha to verify whether you are a being human or a robot. Then do it as usual. see below picture

App-ID and secret key to get facebbok comments, meta tag plugin
5. Now, you have successfuly created your first Facebook App-ID. Just click on Dashboard (located at the left hand side menu). And, you can copy the App ID and Secret key to use on your app or meta tag of your website. see below image,

copy and paste the meta tag api key to your blogger website below head tag

How To Add Facebook Open Graph Meta Tag To Your Blogger or Website

If you want to add Facebook open graph protocol or meta tag to your blogger(only), then add the below code just below the opening head tag of your blogger template,

<!-- Facebook open graph protocol start -->
<b:if cond='data:blog.pageType == &quot;item&quot;'>
<meta expr:content='data:blog.pageName' property='og:title'/>
<meta expr:content='data:blog.canonicalUrl' property='og:url'/>
<meta content='article' property='og:type'/>
</b:if>
<meta expr:content='data:blog.title' property='og:site_name'/>
<b:if cond='data:blog.postImageThumbnailUrl'>
<meta expr:content='data:blog.postImageThumbnailUrl' property='og:image'/>
<b:else/>
<meta content='jpg' property='og:image'/>
</b:if>
<b:if cond='data:blog.metaDescription != &quot;&quot;'>
<meta expr:content='data:blog.metaDescription' name='og:description'/>
</b:if>
<meta content='App-ID' property='fb:app_id'/>
<meta content='https://www.facebook.com/admin-url' property='fb:admins'/>
<meta content='https://www.facebook.com/page-url' property='article:publisher'/>
<meta content='https://www.facebook.com/admin-url' property='article:author'/>
<!-- Facebook open graph protocol ended -->

Customization

1. Replace App-ID with your new created app id.
2. Replace admin-url with yor facebook profile URL(personal).
3. Replace page-url with your facebook fan page URL.

Facebook app id becomes very necessary when we need to configure our several WordPress plugin like 'jetpack'. If you don not integrate app-id with your plugins then your plugin will show you several errors.

Thanks for reading my tutorial. Just appreciate it by sharing it in your social networks.

Thursday, June 1, 2017

Howto Embed a Part of YouTube Video with Start-End Time


Vlogging is one of the crucial part of blogging, considered one of the best tool for expressing ideas. YouTube, Dailymotion is one of the two most popular video sharing site which contains millions of videos that you can share on your blog or website.

Sometimes, you might embed a long video on your site, and also add a note just below the video to tell the visitors to watch only a certain portion. This behavior not only kills time but also irritates the viewers of your video. So it is not a good sense.

How To Embed a Specific Part of YouTube Video on Blogger
The best idea to embed a YouTube video is to take the advantages of the parameter that lets you specify the start and end time. By which you can skip the unnecessary part or the introduction part of a lengthy video as per your desire.


For example, You are embedding a full-length movie from YouTube and want that viewer to focus on a particular scene that begins from 'xx: xx' seconds and ends with 'yy: yy' seconds. So, that when the scene has finished, the video should stop playing. see demo below


Link to a certain portion(time) of a YouTube Video?

1. First of all, navigate to YouTube and find a video which you like to embed and grab the iframe code and paste the code into the Notepad. You iframe code should be something like below,

<iframe width="560" height="315" src="https://www.youtube.com/embed/-ZWGpOSS6T0" frameborder="0" allowfullscreen></iframe>
2. And now, we have to add start and end parameter at the end of the src(URL) of the video that is ?start=xx&end=yy&version=3 

3. Let's say, you want to embed a video which should start from 2:10 and ends to 2:25. So, we need to first convert our start and end time into second. Then the calculation should be,

Start Time (XX) ( 2 × 60 ) + 10 = 130
End Time (YY) ( 2 × 60 ) + 25 = 145

4. And, now the final code after adding start and end parameter should be something like below,

<iframe width="560" height="315" src="https://www.youtube.com/embed/-ZWGpOSS6T0?start=130&end=144&version=3" frameborder="0" allowfullscreen></iframe>
5. That's it. If you are not familiar with coding then this way may be complicated for you. So don't worry, we have created a generator by which you easily cut the video without any coding knowledge.


Cut video using Generator (Easiest way)

Howto Embed a Part of YouTube Video with Start-End Time
If you are still facing problem or you do not want to manually edit the parameter of youtube URL then try our offline generator which is built with JavaScript. You need to subscribe to our email list to download this generator. App will be delivered to your verified email address.


Monday, May 29, 2017

How To Sign Up For Ahrefs Premium (Trial) Account [$179]

ahrefs-premium-account-free
Whether you are a blogger or internet marketer, we all need an SEO tool by which we can, track our keywords position on several search engines, create reports for our clients, generate keyword ideas, track backlinks of competitors, etc.

As we know that there are thousands of SEO tools are available across the web, but the main problem is that you need to pay a lot of money for a subscription. And one of the best tool of SEO is 'Ahrefs' SEO tool.

You can easily sign up for a free account at any time on which you can use their tools only for five times per day. So here in this guide, I will show you a simple method to sign up for Ahrefs premium account (trial) for two weeks.

Requirements:
1. A verified Paypal account: No need to have balance.
2. An email account (Gmail).


How to get Ahrefs premium account (standard package) for free 2017?


1. I assume that you have a verified Paypal account. If you don't have an account, then create a new one.

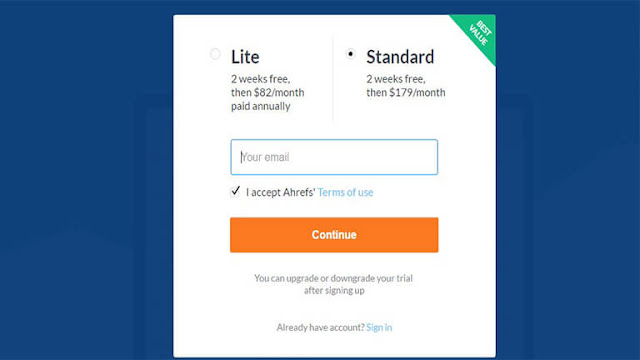
2. Now navigate to Ahrefs SEO website and then click on Start Free Trial (Located at the right-hand side upper corner). You can see the below like sign-up box

ahrefs-premium-seo-trial-account-standard
3. Now enter your email address (Gmail) and then tick on 'terms & conditions'. and then click on 'continue'.

4. Now in the next step, you need to fill up a form which requires your name, address (provide your address which you have been provided in paypal).


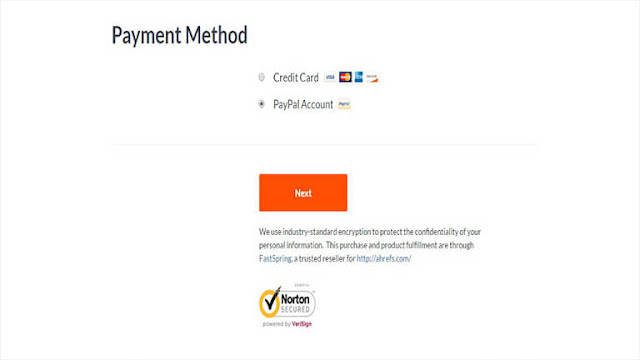
5. Now, you need to select 'Paypal' as payment and then submit the form.

paypal-verification-for-ahrefs-premium-account-free-trial-2-weeks

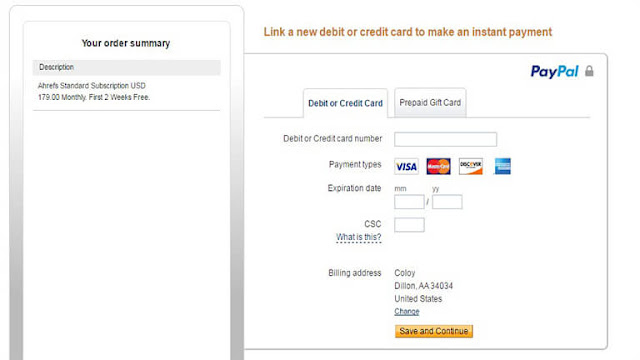
6. Now, you will be redirected to the payment page. Then you can use any emtpy card, payoneer card or credit card and then click on submit.

paypal-payment-ahrefs-premium-account-free

That's it. Now you have a ahrefs premium standard account. You can use this trick again and again.

Tips to create Ahrefs account after the expiry period of 2 weeks,


1. You can add thousands of new email to your paypal account. Just create an extra email account on gmail then linked this email to your Paypal account.

2. Always sign up with a new email account.


1. You must not have any credit or balance on your PayPal or credit/debit card associated with your PayPal account otherwise you will be charged for $179 on the expiry peroid of two weeks.

2. You must cancel your premium subscription on the last day of 2nd week (only if you have kept balance on your paypal or credit or debit card).


Monday, February 27, 2017

How to Generate Direct links of Dropbox, Google Drive Files


How to Generate Direct links of Dropbox, Google Drive Files

Google Drive and Dropbox, one of the most popular, file sharing portal where you can share your files with your friends, family or with your audience. if you are a blogger or content writer, then you can use google drive that provides 15GB storage to host your files for free and this is quite enough to share large files. On the other side Dropbox providing 2GB free storage which is not sufficient but useful or can be used to store important data or files.

One of the most common drawbacks of all these file sharing portals is that they do not provide direct download link for the files. So, I have created a simple link generator which supports Google Drive, Dropbox, OneDrice, Copy, SugarSync. By which you can easily bypass built-in file viewer and force the browser to download the file instead of opening it.

What you need to do?

You need only to obtain share URL of the file that you want to convert to direct link. And then just go to 'Direct link Generator' and then paste the share link into the text box under 'Enter share link' field. and then hit on Highlight and then press CTRL+C to copy the generated URL.

You also have some options of download and reset. If you want to download the file instead of copy the URL. Then You can simply press on download and then download will be started automatically.


Frequently asked questions on obtaining shared URL

1. How to obtain shared URL of Google drive files?

- Right click on the file and then select share.
- And, then click on 'shareable link'.
- And, now shareable link copied to your clipboard.

2. How to obtain shared URL of Dropbox files?

- Hover over the folder directly and then click on share and then click send link.
- If a file then click on share.
- And then copy the under Link to folder or Link to file.

3. How to obtain shared URL of OneDrive files?

- Right click on the file.
- Then click on Get a link.
- Under choose an option select 'Public'.
- And then create link.


Script for Sale
Now purchase this script at only $10 and create your own link generating website and earn money by Adsense. There are numerous sites on the web which are earning huge money and you can be one of them. [Contact here]
7 days money back guarantee.


Friday, February 24, 2017

PopAds Review 2017 - Can it Make Money for your blog?


popads net review - best popup under ads for blogger and website

Popads ad network is one of the most popular pop-ups under advertising network. And it is a great alternative to popcash and infolinks. The best thing about it that you can withdraw you earned money at any time once, your unpaid earning is reached to a minimum amount of 5$. Currently, It's providing highest CPM rates, excellent technical support, fastest payment in the industry.

From the last three years, I am using Google Adsense for my blog and no doubt it is one of best advertising program which pays high CPC. After that, I was looking for other monetizing networks which can work well along with Adsense for my blog, and that's when I stumbled upon popads net network.

And the first question that came to my mind was,
Can it make money for my blog?
So, I decided to get signed up for this network to check whether it can make money for my blog.  And after using it for two months (Total traffic upto two month, only 20000), I earned 68.26$ that you can see in the below screenshot of my dashboard, (popads earnings)

popads net review - earning dashboard payment
So, in this review, I will answer you some frequently asked question which you may encounter while choosing the best pop-ups under ad network,


How Popads works?

Unlike AdSense, it does not require an ad space that means you visitors don't need to click on anything. And you will get paid whenever your visitors will browse your website.

Popads is great if you are receiving traffic from USA, UK, Cannada because it provides high eCPM for the European countries. But for Asian traffic, you may not earn much until you are getting a huge amount of organic as well as social traffic. (100% fill rates)

Is PopAds.Net Scam Network?

Ofcourse not. It has a large number of publishers who are happy with its technical support and on-time payment.

Most of the people have written the negative reviews on several forum, and this may be due to account ban. Most of the webmaster use bot traffic trick to increase their page views and earnings which is an illegal method. And due to this reason, their account gets banned from the popads network.

But, My experience says that they are legit and genuine because I (many webmasters) already get paid for my earnings. You can see my 'payment proof' below,

popads net payment proof

How To Sign Up for Popads?

The sign-up process of popads network is very easy, and you only need to fill up a publisher form. Just click on the below button to go to popads.net website and fill up a simple form. And you need to wait for 24 hour to get an email from their team that your website is approved.


Can your website be approved? 

Absolutely yes. It accepts all type of website including adult, non-adult, hacking, and cracking.

Is their JavaScript plugin SEO friendly?

Yes. For API integration, they provide a small bit of JavaScript code which you need to add just above the closing body tag. And the best thing about it that, it does not affect the loading speed of your website which is one of the ranking factors of Search Engine Optimization.


What are the CPM rates of popads net?

CPM Rates (approx)
CountryRates (per 1000 view)
United States$14.72
United Kingdom$7.65
Canada$7.05
Australia$10.64
India$2.05

What is the Payout Threshold?

The Payout threshold is very low. You will get paid, whenever your unpaid earnings reach to a minimum of 5$. Payment will issue within 24 hours.

What are the Payment Methods?

Modes of payment:

ModesMinimum AmountPayment frequency
PayPal$5.00 USDEvery Day
Debit Card (Payoneer)$20.00 USDEvery Day
Bank Transfer (Payoneer)$20.00 USDEvery Day
Wire Transfer$2000 USDWeekly
Payza$5.00 USDEvery two weeks

Conclusion

As there are thousands of alternative available for pop-ups under ads but no one can compete with popads because it provides high CPM and daily payment. If you rejected by Adsense and media.net program, then I must recommend you to join this network.

I hope the above review will help you to decide the best pop-ups under ads for your blog. If you have any doubt or you are using any other network which is providing better eCpm rates then do let me know by commenting below.


Popads Review
PublishedJan 15, 2017
SummaryPopads is a rising player among popular pop-ups ad network that is gradually recognized as the best alternative to Infolinks and Popcash.
ReviewerVishal Chopra
PublisherBlogger SEO Lab
Rating4/5


Sunday, February 19, 2017

How To Add WordPress Like "Click To Tweet" Widget In Blogger


better click to tweet widget for blogger
"Click To Tweet" is one of the best plugin ever made for WordPress which allows to the webmaster to quickly add shareable tweet in their blog post.

It's been a while since Google has begun considering social flags as a noteworthy positioning variable. So when we started to talk about SEO, then first thing comes to our mind is that social media marketing. Social media like Facebook and Twitter are the most popular platform where more than 85% of the population of the world use to talk with each other.

So, when you add a social sharing button like tweet, then it becomes easier to them to share your content on their social profiles easily. see demo below,


In this tutorial, I will show you 'How to add WordPress like 'click to tweet widget' in your blogger?'. You can also use the following tutorial to insert the widget into your HTML website also.

How to add  'Click To Tweet' Widget in Blogger


Note:- Backup your blog template. So that when anything goes wrong with your template then you can restore back.


1. The very first thing you need to do is that login to your blogger and then navigate to template section and then add the below CSS code just above
]]></b:skin>

/* click to tweet widget css by http://www.bloggerseolab.com */
.click-to-tweet{border:1px solid #ddd;-moz-border-radius:4px;-webkit-border-radius:4px;border-radius:4px;padding:26px;margin:15px 0;background-color:#fff}.click-to-tweet .click-to-tweet-text{text-align:left;font-family:"museo-sans",sans-serif;font-weight:300;margin-bottom:10px}.click-to-tweet .click-to-tweet-text a{color:#aeaeae;font-size:26px;line-height:140%;letter-spacing:.05em;font-weight:100;text-decoration:none;text-transform:none}.click-to-tweet a.click-to-tweet-btn{display:block;text-transform:uppercase;font-family:"Helvetica Neue",Helvetica,Arial,sans-serif;font-size:12px;font-weight:700;line-height:100%;color:#aeaeae;float:right;padding-right:24px;text-decoration:none;background:transparent url(https://blogger.googleusercontent.com/img/b/R29vZ2xl/AVvXsEhA9rOEFON2bXW5AnKEXW7Rw8-MZWVV0mli2Mdr59vWtr8PZFm3Uw8Odpwr9L4pNWgOu2ybhylst8Bny3fb5XNAlP2uE3Cqm3hqtYMzmnoeXM_nCmru0ISAT8oie43tZH4tXZwu4pQPUfg/h120/twitter-little-bird.png) no-repeat right top}
/* click to tweet widget css by http://www.bloggerseolab.com */
2. Now, you need to use below generator (You can find generator at the end of this post). This generator is created by me by putting a lot of hard work. So do share this plugin with your fellow readers or on your social networks.

How to use the 'Click To Tweet' widget Generator

This tweet box generator is create with a simple design so that anyone can use it without any problem.

  1. Here you just need to put your shareable text in the first box.
  2. In the second box, you need to put your web page URL. You can also leave it blank, if you do not want to add your URL in the tweet.
  3. And then finally you need to hit on 'Generate'.
  4. After that, generator will give you a simple HTML code which you need to put in your web page or blogger blog post like below,
better click to tweet widget for blogger
            5. That's it.


Your Tweetable Text:

Your Page URL:


Copy and paste the below code in your template:

Click To Tweet Generator by @bloggerseolab, Created by Vishal Chopra

I hope that the above step by step guide and the Generator helped you to add WordPress like Click To Tweet plugin in your blogger template.

If you have doubt or question regarding the above generator then feel free to ask in the below comment box. Do not forget to share this plugin.

Friday, February 17, 2017

How to host Images and JavaScript/CSS files on Google Drive


host images, javascript and css files on google drive
After serving file hosting service on Gdrive for three years, Google had decided to discontinued the static website hosting on google drive like they depreciated Google code hosting. But if you will be happy to know that 'We can still host our files on Google Drive for free'


And in this tutorial, I will show you the 100% working method to host you Images, CSS and JavaScript using Google Drive for free 2017 (New Guide).

Demo. The following image is hosted on Google Drive

host image on google drive demo


Host Images, CSS and JavaScript files on Google drive


Step 1: Upload your files to Google Drive

  1. The very first thing you need to do is that create a folder on Google Drive and change the sharing permission of the file to public.

  2. And now upload your Images, JavaScript and CSS files to the folder.

Step 2: Obtain the sharing URL of the file

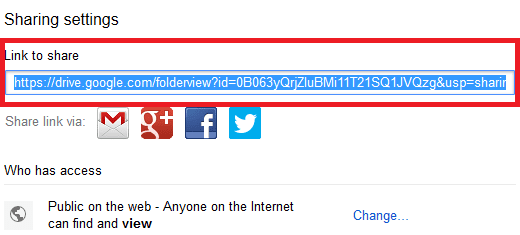
Now you need to obtain the link of your uploaded file. Just right click on the file and then select 'share' and then copy the link of the file and keep safe in notepad. see below picture.

host images and javascript and css files on google drive for free

Step 3: Create the direct download link of the URL (permalink)

Genrally, Google drive does not provide the direct link of the file. It only shows the sharing link of the file as Google photos do. So, we need to apply a trick to get the direct link to the file.


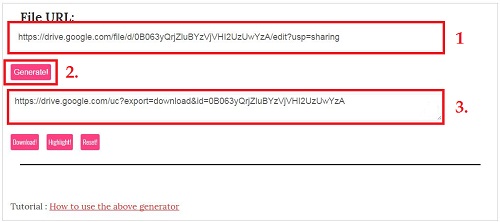
  1. First of all, navigate to direct download link generator. You can see the below like generator. And you just need to enter the sharing URL (which you kept safe in notepad at step 2) of the file into the number 1 text box and then hit on ' Generate'.

    host Images and JavaScript/CSS files from Google Drive

  2. And then, copy the generated direct link of the file and then keep safe in notepad.

Step 4: Embed the Image or Link JavaScript/CSS  Files in a HTML page

As you are a developer. You already know the HTML code to embed Images in a web page or link JavaScript and CSS files into the HTML.

If you want to embed an image, then you use the below code:

<img src='your-direct-download-link-of-image'/>
Or If you want to link CSS files, then use the below code:

<link href='your-direct-link-of-css-file' rel='stylesheet'/>
Or If you want to link JavaScript files, then use the below code:

<script src='your-direct-link-of-javascript-file'/>

Conclusion

As I said earlier, Google depreciated their hosting feature, and the above solution is a trick to force Google to host our files on Gdrive. So, you might face a problem of loading speed on your website.

Recently, I have made a tutorial to host JavaScript and CSS files on Github using RawGit (By MaxCDN) and also featured five best free image hosting website to host your image. And I will also recommend you to follow my recently published articles.

And you might also like to read 'Load Youtube and dailymotion video player on demand.'

Thanks. I hope that the above step by step guide helped you to sort your problem regarding hosting files on Google Drive for free.