If you are serious about blogging and want to make your blog best in all category, then you no only need to focus on high-quality content but also on blog's loading speed. If your blog loads speed is not good. Then your blog visitors will start to leave your blog on the very first visit and will move to some other blog for the same article.
In this tutorial, I will introduce you a new free CDN service provider viz, RawGit(by MaxCDN) that is an open-source tool that serves raw files directly from GitHub with the correct Content-Type headers. And also, explain to you How to set up it for unlimited bandwidth using GitHub. But before this, let me explain something about its advantages,
Why should you use RawGit CDN (Content Delivery Network)?
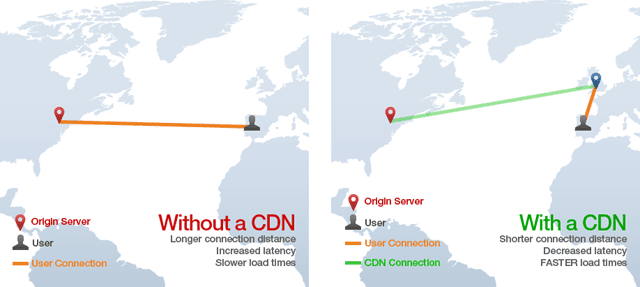
CDN, stands for content delivery network, is a broadly distributed system of multiple servers at various locations in the world that helps in delivering static contents like CSS, JavaScript, and Images to a user based on the geographical locations of the user.

1. It will boost the loading time of your blog or site by serving the content of your web page to a user based on their location.
2. It will reduce the amount of bandwidth.
3. It will save your money when you running your own server.
4. It will improve user experience and decrease your blog bounce rate.
How to create an account on GitHub?
First of all, navigate to GitHub and there, you have to follow 3 steps to create a personal account. Just do it as usual. On the 2nd step, you will ask to choose a plan, then select Free from the list.
How to create a repository?
1. After successfully sign up. You will automatically be redirected to the Dashboard where there you will see an option for creating a new repository.
You cannot be able to create a repository until you verify your account. Just navigate to settings (located at left sidebar) > emails > send email verification.
2. Now, fill up all the field as stated in the below image,

3. Now, we need to create a README.md file that is like a Readme.txt file where you can write anything. And it is very necessary.

How to create a GitHub Project to host JavaScript or CSS files?
1. First of all, navigate to settings > and scroll down until you see Automatic Page Generator, then click on it and then create a page by filling some required field and publish it.2. Now, you can create a CSS and JavaScript file by just clicking on plus(+) button.

3. Every time, when you click on plus(+) button, a code editor will appear. Where you can add your code. Don't forget to add the extension name like css or js. see below image,

4. Now, at the bottom of the page, you will see Commit button. Just click on it to host or publish your files on the web.
5. Now, just right-click on the newly created or uploaded file and select copy link location. see below image

6. And, then paste the copied link into your Notepad. You copied link will something like below,
https://github.com/woothemes/FlexSlider/blob/master/jquery.flexslider.js
How to link the GitHub default URL with RawGit CDN for unlimited Bandwidth?
1. First of all, navigate to Rawgit official website.2. You will see there some input fields. Then, paste the default GitHub Link (which you copied on Notepad) on the first input field.
3. RawGit will provide you two different links first one for limited traffic and the second one for unlimited traffic or Production. Then just copy or use the 2nd link which is for Production. see below image,

Now your JavaScript file is ready to use on your blogger blog or website. Just use below like tag,
<script src="cdn.rawgit.com...........js" type="text/javascript"></script>
Always use RawGit URL for production (cdn.rawgit.com) instead of for dev/testing (rawgit.com). Because, the first generated URL which you can see on the above image is for only testing purpose or low traffic website.
If you use dev/testing URL (rawgit.com) instead of URL for production (cdn.rawgit.com), RawGit will display a pop up warning message like below,

If you use dev/testing URL (rawgit.com) instead of URL for production (cdn.rawgit.com), RawGit will display a pop up warning message like below,

Wrapping up
If your blog is getting a lot of traffic, then it is the best time to use a content delivery network that can handle all your bandwidth by caching all the files of your site and deliver them based on the user's location.There are a ton of plugin available for WordPress that can be install in just a few clicks. And but there is nothing only for Blogger. So, we know that 'necessity is the mother of invention.' I have researched on it using google search and invented this idea to use the MaxCDN for hosting the static files for free with unlimited bandwidth indirectly.
Thank You!
No comments:
Post a Comment