Friday, February 17, 2017

How to host Images and JavaScript/CSS files on Google Drive


host images, javascript and css files on google drive
After serving file hosting service on Gdrive for three years, Google had decided to discontinued the static website hosting on google drive like they depreciated Google code hosting. But if you will be happy to know that 'We can still host our files on Google Drive for free'


And in this tutorial, I will show you the 100% working method to host you Images, CSS and JavaScript using Google Drive for free 2017 (New Guide).

Demo. The following image is hosted on Google Drive

host image on google drive demo


Host Images, CSS and JavaScript files on Google drive


Step 1: Upload your files to Google Drive

  1. The very first thing you need to do is that create a folder on Google Drive and change the sharing permission of the file to public.

  2. And now upload your Images, JavaScript and CSS files to the folder.

Step 2: Obtain the sharing URL of the file

Now you need to obtain the link of your uploaded file. Just right click on the file and then select 'share' and then copy the link of the file and keep safe in notepad. see below picture.
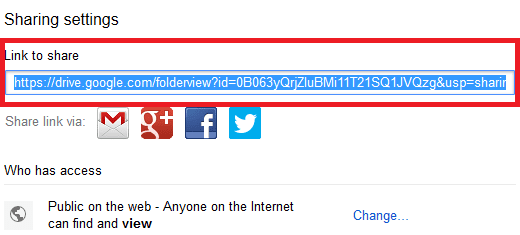
host images and javascript and css files on google drive for free

Step 3: Create the direct download link of the URL (permalink)

Genrally, Google drive does not provide the direct link of the file. It only shows the sharing link of the file as Google photos do. So, we need to apply a trick to get the direct link to the file.


  1. First of all, navigate to direct download link generator. You can see the below like generator. And you just need to enter the sharing URL (which you kept safe in notepad at step 2) of the file into the number 1 text box and then hit on ' Generate'.
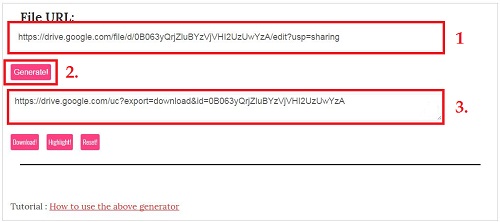
    host Images and JavaScript/CSS files from Google Drive

  2. And then, copy the generated direct link of the file and then keep safe in notepad.

Step 4: Embed the Image or Link JavaScript/CSS  Files in a HTML page

As you are a developer. You already know the HTML code to embed Images in a web page or link JavaScript and CSS files into the HTML.

If you want to embed an image, then you use the below code:

<img src='your-direct-download-link-of-image'/>
Or If you want to link CSS files, then use the below code:

<link href='your-direct-link-of-css-file' rel='stylesheet'/>
Or If you want to link JavaScript files, then use the below code:

<script src='your-direct-link-of-javascript-file'/>

Conclusion

As I said earlier, Google depreciated their hosting feature, and the above solution is a trick to force Google to host our files on Gdrive. So, you might face a problem of loading speed on your website.

Recently, I have made a tutorial to host JavaScript and CSS files on Github using RawGit (By MaxCDN) and also featured five best free image hosting website to host your image. And I will also recommend you to follow my recently published articles.

And you might also like to read 'Load Youtube and dailymotion video player on demand.'

Thanks. I hope that the above step by step guide helped you to sort your problem regarding hosting files on Google Drive for free.

Friday, January 20, 2017

Load YouTube & Dailymotion Video Player Faster & On Demand


When you embed a Youtube or Dailymotion video on your blog or website, then the video has to load a bunch of extra resources like CSS, JavaScript or images to rendering the videos. And, the bad thing about it that it always load these resources even if a visitors does not hit the play button. These resources increase not only the weight of your template but also the visitor's browser will also need to make multiple HTTP requests to render the videos.

How To Load YouTube & Dailymotion Videos On Demand
Have you ever noticed that Google plus shows the embedded videos on their page with a different thumbnail style. Google+ only display a thumbnail image with a custom play button instead of displaying a embedded video player to make it look like a player. And, when a user clicks over the thumbnail, then the preview thumbnail is replaced by the standard video player. That means the browser loads all the resources that are required to play the video only once when necessary. And, this reduces the loading speed of your website, see demo below,


What are the advantages?

1. Reduce loading speed
2. Reduce HTTP requests on client's browser
3. Very necessary for SEO
4. Reduce weight(page-size) of your template
5. Load videos only when necessary
6. Embedded videos will be responsive

Install Plugin on your blogger template

Backup your blogger template.

1. First navigate to blogger Dashboard > Template > Edit template.
2. Then search for </body> and then copy and paste the below code just above </body>


<!-- videos load on demand script by http://www.bloggerseolab.com start -->
<script src='http://yourjavascript.com/31169646111/load-videos-on-demand.js' type='text/javascript'></script>
<style>
.video-container { display: block; margin: 20px auto; width: 100%; max-width: 600px; }
.youtube-player, .dmn-player { display: block; width: 100%; /* assuming that the video has a 16:9 ratio */ padding-bottom: 56.25%; overflow: hidden; position: relative; width: 100%; height: 100%; cursor: hand; cursor: pointer; display: block; }
img.youtube-thumb, img.dmn-thumb { bottom: 0; display: block; left: 0; margin: auto; max-width: 100%; width: 100%; position: absolute; right: 0; top: 0; height: auto;transition:all ease-in-out 0.25s; }
img.youtube-thumb:hover, img.dmn-thumb:hover {transform:scale(1.05);transition:all ease-in-out 0.25s;}
div.play-button { height: 72px; width: 72px; left: 50%; top: 50%; margin-left: -36px; margin-top: -36px; position: absolute; background: url("http://i.imgur.com/TxzC70f.png") no-repeat; }
#youtube-iframe, #dmn-iframe { width: 100%; height: 100%; position: absolute; top: 0; left: 0; }
</style>
<!-- videos load on demand script by http://www.bloggerseolab.com end -->
3. And, then save the template.

How to embed YouTube and Dailymotion videos on blog posts?

1. Just navigate to a existing blog post or make a new post and then select to HTML view.
2. Now add the below code for embedding a YouTube video,

<div class="video-container">
<div class="youtube-player" data-id="VIDEOID"></div>
</div>
Customize: Replace the VIDEOID with the id of your YouTube video.

3. If you want to embed a Dailymotion video, then use the below code,

<div class="video-container">
<div class="dmn-player" data-id="VIDEOID"></div>
</div>
Customize: Replace the VIDEOID with the id of your Dailymotion video.

Frequently asked questions:

VIDEOID is mentioned in the code.

How to find the video id of a YouTube video?

Just copy and paste the video URL of your YouTube video in Notepad. And you can see a combination of numbers and letters after an equal sign. This is your video ID. see below URL.

https://www.youtube.com/watch?v=-ZWGpOSS6T0

How to find the video id of a Dailymotion video?

Find a Dailymotion video which you like to embed. Here is an example

http://www.dailymotion.com/video/x8oma9_warp-whistle_shortfilms

In this example, the ID would be x8oma9 as you can see above.


Wrapping up

The idea to load Dailymotion videos on demand is taken from Labnol. They already made a tutorial for embedding YouTube videos on demand while keep it responsive. So, I have made some changes to the JavaScript code for adding support to Dailymotion videos also.

The whole idea for embedding videos on demand is taken form Google plus. We only made it possible for blogger or website for reducing loading speed which is a significant factor for calculating page rank..

Thank You. I hope that you will like our work and also appreciate it by sharing on social networks.

Saturday, December 24, 2016

OneSignal - Add Free Web Push Notifications In Blogger Blog

free web push notification for blogger - onesignal
Web push notifications is now a new strategy to grow your subscriber. Most of the popular website like Facebook, Twitter are also now using web push notification on their websites. As per the case study by YouNow it is revealed that user's retention has increased by 19%.

Recently, I have started using web push notification in my technology blog. And in this tutorial, I will guide you how to add web push notification your Blogger Blogspot. But before jumping to the whole process, let me tell you something about OneSignal.

What is OneSignal Web Push Notification?

OneSignal is an awesome service which allows adding web push notification to your blog and website. It is a communication channel which enables you to send the custom rich text notifications to your subscribers.

OneSignal lets you send custom messages to different devices or internet browsers. That means if a person subscribed to your blog through their Android or iOs (or any other) device, then your notification will appear on their home screen (or locked screen also). Or if they subscribe with their chrome, firefox (or any other browsers) on their desktop or laptop, then the notification will appear on the right-hand side lower corner of their browser.

What are the features of OneSignal?

As I said above, OneSignal display a short message to the users either on their device's home screen or desktop browser by playing a notification tune. Following are the marvelous features,

1.   Free
2.   HTTPS/SSL not required.
3.   Schedule notification to send at a later date.
4.   Add unlimited number of subscriber.
5.   Support all devices and browsers.
6.   Segmentation targeting.
7.   Unlimited notifications.
8.   Realtime analytics.
9.   Import & Export your data & subscribers.
10.   A/B testing.
11.   Full API access.

How to add OneSignal web push notification in blogger?


1. The very first thing you need to do is to sign up or create a free account. Join here

2. Now you need to create your first app.  On, you app dashboard, click on 'Add a new app'.

free web push notifications widget for blogger blog
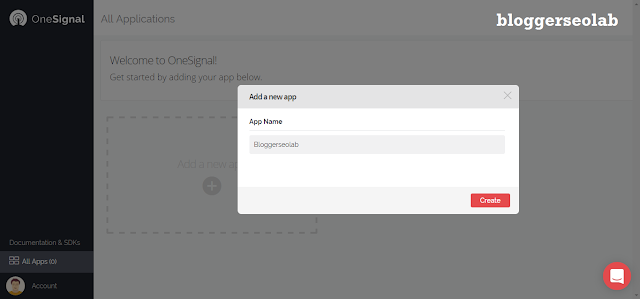
3. Now a pop-up window will appear. Here you need to add a name of your app. and then click on 'Create'.

free web push notification widget in blogger blog
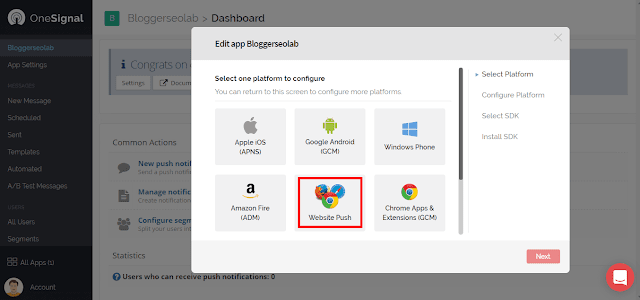
4. Now again a window will appear 'Select one platform to configure'. here you need to select 'Website Push'. After that, click on 'Next'.

free web push notification in blogger blogspot
5. Now, again a window will appear then click on 'Google Chrome & Mozilla Firefox'. After that, click on 'Next'.

free web push notification in blogger blogspot
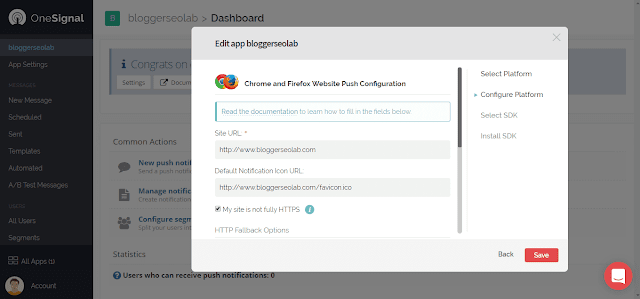
6. Now enter your blogger 'URL Address' and 'Favicon URL'. And then click on 'Save'.

free web push notifications for blogger blogspot
7. Now, 'select your target SDK' and then select 'Website Push'. And then click on 'Next'.

free web push notification in blogger blog
8.Now, copy your App ID and keep safe in your Notepad. (Red Color)

free web push notification widget for blogger
9. Now the last part, you need to add JavaScript SDK in your blogger template. Just add the below code above the closing head tag.

<!-- OneSignal Web Push Notification Widget www.bloggerseolab.com -->
<script src="https://cdn.onesignal.com/sdks/OneSignalSDK.js" async='async'></script>
<script>
var OneSignal = window.OneSignal || [];
OneSignal.push(["init", {
appId: "YOUR_APP_ID",
autoRegister: false, /* Set to true to automatically prompt visitors */
subdomainName: 'SUBDOMAIN_NAME',
httpPermissionRequest: {
enable: true
},
notifyButton: {
enable: true /* Set to false to hide */
}
}]);
</script>
<!-- OneSignal Web Push Notification Widget www.bloggerseolab.com -->
Note: 
- Replace 'YOUR_APP_ID' with the app id of your app. (which you copied at step 8)
- And, 'SUBDOMAIN_NAME' with your subdomain name. As in my case 'bloggerseolab'.

10. And now save the template.That's it.

How to send notification?

1. You just need to select 'New Message' (located at the left hand sidebar menu). see below picture

free web push notification widget for blogger

Wrapping Up

If we compare OneSignal with PushCrew, pushEngage, then I find that only OneSignal is providing a lot of feature without any cost. The installation process is very simple as I shown above. Web push notification is the best tool to send notification because here you will get high click through rate than email marketing.

I hope the above tutorial has helped you to add Web push notification widget in your blogger without any hassle. If you know, there are the best alternative available then comment below.


Sunday, December 18, 2016

5 Best Free Image Hosting Websites for Ebay Item Listing

free image hosting for ebay listing and blogger
Images are one of the crucial parts of web designing because it makes your page looks beautiful and also increase the engagement. When you buy a hosting package from GoDaddy or any other, then they provide some storage on where you can upload your files like CSS, JavaScript, and images.

But Ebay does not provide such service because they are an E-commerce company which provides you only a gateway or a platform from where you can buy and sell goods.

While choosing a web server for hosting your pictures, you should consider the five following thing,

1. Enough Disk Space
2. Server Bandwidth
3. Hotlinking, So that you can embed pictures on eBay product description.
4. Uploading procedure is simple.

So I have featured here the best free image hosting providers with unlimited bandwidth and hotlinks,

1. Google Photos

Google Photos - free image hosting
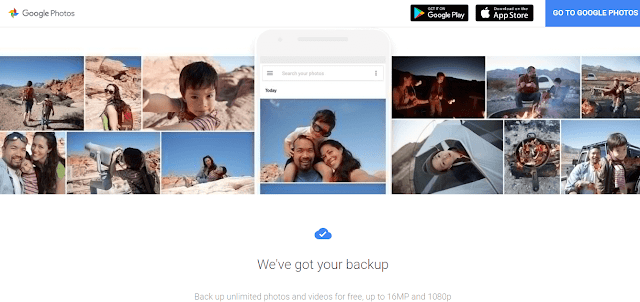
Before Google photos, Picasa was also a part of Google photo sharing service where Gmail users were able to upload their images and also able to obtained hotlinks from there. But, now Picasa is shut down, and Google photos are only the service which provides free 15 GB storage along with hotlinks. And the images can be embed anywhere on the internet with direct linking.

2. Postimage

Postimage - free image hosting for your website
This picture hosting website provides unlimited storage to webmaster without charging a penny. One of the best things of Postimage is that you no need to be a member to upload the picture to their server, but if you become the member, then you will have the option to delete the uploaded image within your account cPanel.
You can either upload your images by visiting their site or by downloading their desktop app. All the option will provide you to upload the pictures one by one or you can also upload in bulk.


3. GifyU

GifyU - free image hosting for ebay's item listing
Like Postimage, you can also upload files directly from your computer or by visiting their website. It provides you the feature of unlimited bandiwtdh so that you site shall never go down. The only limitation is that your images should not be larger than 100 MB. You get the direct link as BBCodes (for forum), HTML Links (can be embed anywhere) and link. And your picture shall also appear here.

4. Imgur

Imgur - free image hosting webiste for ebay
Imgur is a free image hosting website which lets you store unlimited number of photos without registration. The photos uploaded there never gets expired until you decide to delete them. You can upload gif, jpeg, png, apng, jpg etc. GIF uploads shall not be larger than 200 MB. One of the important features of Imgur is that your image gets automtically resized or compressed without losing quality to save server space. You can also create a photo album to embed at your website using jquery or JavaScript.

5. TinyPic

TinyPic - free image hosting
It is just similar to Imgur and postimage, but the features are not limited to the uploading of photos only, you can also upload videos to their server without any registration. You can even upload the pictures by URL of an image. And the acceptable formats are gif, jpg, png, and BMP. One of the limitations of this server is that photos will be scheduled for deletion if photos are not getting enough impression for 90 days.


Friday, December 16, 2016

Sanaya - Super SEO Friendly And White Blogger Template

free responsive blogger template
Hoo! after one year from the date when I had completed HTML/CSS coding, publishing this super white blogger template which is SEO friendly. This template created by keeping the importance of Google SEO, loading speed, and beautiful white layout. This template contains several beautiful alerts box, note box, highlight box, custom button and a customizable syntax highlighter. This template is very responsive that caters for any possible screen resolution.


Features:

  1. Version 1.5 (updated on 17/01/2017)
  2. Custom Landing page - very helpful to grow Feedburner subscriber.
  3. Facebook open graph protocol.
  4. Twitter Cards Meta Tags.
  5. Meta Description, and meta keywords for Search Engine Optimization.
  6. Robot meta tag added for fast crawling.
  7. Full-Width Forum Page
  8. Alerts Box, Note Box, Highlight box.
  9. Syntax Highlighter.
  10. Insert video and image in blogger comment's box.
  11. Super Responsive.
  12. Custom 404 Error Page.
  13. Custom chrome scrollar bar.
  14. Multi dropdown menu.
  15. Related Post widget.
  16. Social share widget at the end of the post.
  17. Subscribe to download plugin.
  18. Easily integrate with Live support widget by Getsitecontrol.
  19. Font-awesome icons.
  20. Easy adaptable to Disqus commenting system.


    And one of the most important feature is that life time free support. This is the v1 (updated v1.4) template. So, I will update it in future. You can also ask me to add features.

    Though, I have added manual HTML/CSS/JavaScript set up in blogger footer instead of blogger defaults widget. So, that you can customize footer style. I have added author' s bio box, label html widget (You can customize at your own order.) and a recommend box (you can add here affiliate link).

    Make money blogging

    • Join Getsitecontrol affiliate program and make 3$ for every lead that you refer.
    • Join Infolinks and make money using text-ads and their referral program.
    • Join Popads and make money with pop-ups ads and referral program.

    If you are a newbie blogger and don't know how to set up a blogger template. Then just sit back and relax and let us do the job for you. Cost is only 1$. contact here

    Thursday, December 1, 2016

    How To Add a Live Chat Support Widget in Blogger Free


    How To Install a Live Chat Support Widget on Blog Free
    If you are running a blog on which, you provide tech. Guides then there may be chances that your readers may not be able to apply your guides. And at that time, your visitor wants to chat with you to get the proper solution. There is a large number of the website available across the web which providing chatting plugin for blogs or WordPress either for free or charging some monthly fees.

    I have tried almost half dozen of plugins (both free or paid) for my blog and noticed that no one is providing the proper features to satisfy my needs. And then I came across the Getsitecontrol plugin that not entirely but providing almost all the features that I wanted to get on my blogger blog.

    How to Add Live chat widget on your blog?

    1. First of all, create a free account. Live chat

    2.  Now, on your GetSiteControl Dashboard. Navigate to site setting > install and then copy and paste all the code just above the closing </body> tag on your blogger template.

    How To Install a Live Chat Support Widget on Blog Free
    3. Now navigate to getitecontrol dashboard  (just click on the Dashboard, located at the top left hand side upper corner).


    4. And there you will find a drop down menu. Just hit on that and then select Chat option. see below picture
               
    shoutbox, chatbox, tagboard,
    5. And now on appearance tab, just select position option and then hit on ok. see the below picture

    shoutbox, chatbox, tagboard, plugin for wordpress, blogger and site
    6. And, a pop box will appear like below just click on Activate and you are done. That's it.

    shoutbox, chatbox, tagboard, plugin for wordpress, blogger and site
    Now go back to your blog or site and get ready to chat with your visitors in real time.

    Wrapping Up

    Live chat widget is one of the most important part of a blog or website where you are selling digital items or running an ecommerce site. So that you can easily communicate with your customers and convert your first time visitor into a long time customer or subscriber.

    With this live chat tool, I was able to get more than 900 subscriber in the month of November 2015. By which I was made 450$ (not too much but enough) with my tech. blog Hugestreet.

    Thank You. Like this article and share it on facebook, twitter below.

    If you have any question in mind or unable to install this widget then comment below. I love to answer your question.

    Also Read: Create a Subscribe to download plugin for blogger


    Saturday, November 26, 2016

    How To Host CSS, JavaScript Files on Github with Rawgit


    If you are serious about blogging and want to make your blog best in all category, then you no only need to focus on high-quality content but also on blog's loading speed. If your blog loads speed is not good. Then your blog visitors will start to leave your blog on the very first visit and will move to some other blog for the same article.

    In this tutorial, I will introduce you a new free CDN service provider viz, RawGit(by MaxCDN) that is an open-source tool that serves raw files directly from GitHub with the correct Content-Type headers. And also, explain to you How to set up it for unlimited bandwidth using GitHub. But before this, let me explain something about its advantages,

    Why should you use RawGit CDN (Content Delivery Network)?

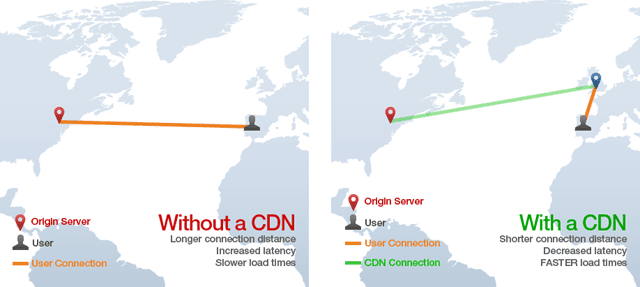
    CDN, stands for content delivery network, is a broadly distributed system of multiple servers at various locations in the world that helps in delivering static contents like CSS, JavaScript, and Images to a user based on the geographical locations of the user.


    1. It will boost the loading time of your blog or site by serving the content of your web page to a user based on their location.
    2. It will reduce the amount of bandwidth.
    3. It will save your money when you running your own server.
    4. It will improve user experience and decrease your blog bounce rate.


    How to create an account on GitHub?

    First of all, navigate to GitHub and there, you have to follow 3 steps to create a personal account. Just do it as usual. On the 2nd step, you will ask to choose a plan, then select Free from the list.

    How To Host CSS, JavaScript Files on Github with Rawgit

    How to create a repository?

    1. After successfully sign up. You will automatically be redirected to the Dashboard where there you will see an option for creating a new repository.

    How To Host CSS, JavaScript Files on Github with Rawgit

    You cannot be able to create a repository until you verify your account. Just navigate to settings (located at left sidebar) > emails > send email verification.


    2. Now, fill up all the field as stated in the below image,

    How To Host CSS, JavaScript Files on Github with Rawgit
    3. Now, we need to create a README.md file that is like a Readme.txt file where you can write anything. And it is very necessary.

    How To Host CSS, JavaScript Files on Github with Rawgit

    How to create a GitHub Project to host JavaScript or CSS files?

    1. First of all, navigate to settings > and scroll down until you see Automatic Page Generator, then click on it and then create a page by filling some required field and publish it.

    2. Now, you can create a CSS and JavaScript file by just clicking on plus(+) button.

    How To Host CSS, JavaScript Files on Github with Rawgit
    3. Every time, when you click on plus(+) button, a code editor will appear. Where you can add your code. Don't forget to add the extension name like css or js. see below image,

    How To Host CSS, JavaScript Files on Github with Rawgit
    4. Now, at the bottom of the page, you will see Commit button. Just click on it to host or publish your files on the web.

    5. Now, just right-click on the newly created or uploaded file and select copy link location. see below image

    How To Host CSS, JavaScript Files on Github with Rawgit
    6. And, then paste the copied link into your Notepad. You copied link will something like below,

    https://github.com/woothemes/FlexSlider/blob/master/jquery.flexslider.js

    How to link the GitHub default URL with RawGit CDN for unlimited Bandwidth?

    1. First of all, navigate to Rawgit official website.

    2. You will see there some input fields. Then, paste the default GitHub Link (which you copied on Notepad) on the first input field.

    3. RawGit will provide you two different links first one for limited traffic and the second one for unlimited traffic or Production. Then just copy or use the 2nd link which is for Production. see below image,

    How To Host CSS, JavaScript Files on Github with Rawgit
    Now your JavaScript file is ready to use on your blogger blog or website. Just use below like tag,

     <script src="cdn.rawgit.com...........js" type="text/javascript"></script>

    Always use RawGit URL for production (cdn.rawgit.com) instead of for dev/testing (rawgit.com). Because, the first generated URL which you can see on the above image is for only testing purpose or low traffic website.

    If you use dev/testing URL (rawgit.com) instead of URL for production (cdn.rawgit.com), RawGit will display a pop up warning message like below,

    How To Host CSS, JavaScript Files on Github with Rawgit

    Wrapping up

    If your blog is getting a lot of traffic, then it is the best time to use a content delivery network that can handle all your bandwidth by caching all the files of your site and deliver them based on the user's location.

    There are a ton of plugin available for WordPress that can be install in just a few clicks. And but there is nothing only for Blogger. So, we know that 'necessity is the mother of invention.' I have researched on it using google search and invented this idea to use the MaxCDN for hosting the static files for free with unlimited bandwidth indirectly.

    Thank You!